
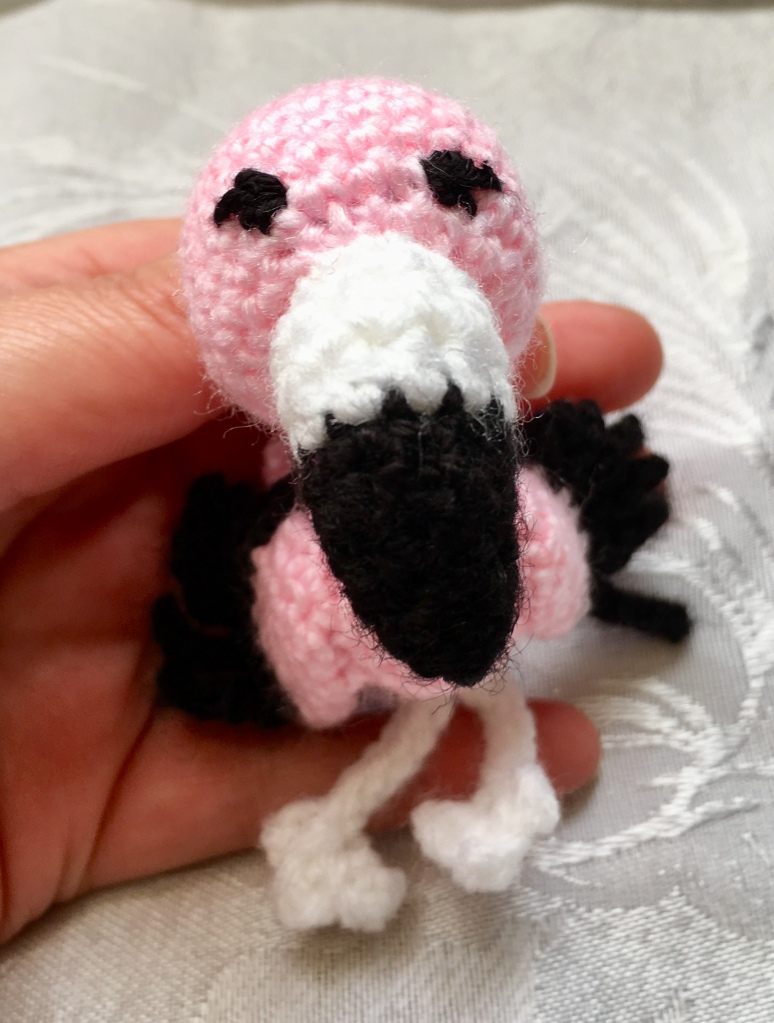
Flossy the Flamingo Keyring Free Pattern – Handmade Crochet Amigurumi
Following on from the flamingo I made back in April. I give you Flossy the Flamingo Keyring Pattern

This pattern was designed for a flamingo lover friend who requested a custom made flossy the flamingo keyring. You could make it into a keyring like I have, add ribbon to the top of the head or leave it as a small soft plushie, you choose!
You will need:
- 3.5mm / 4mm crochet hook (depending on how tight you crochet, I used a 3.5mm)
- DK yarn in pink, white & black (I’m unsure of the amount I used but it was less than 50g of each)
- Soft toy filling
- Darning needle to sew it all together
- Keyring attachment (if using)
Stitches / Abbreviations: (US Crochet)
- MR – Magic Ring
- SC – Single Crochet
- DC – Double Crochet
- HDC – Half Double Crochet
- INC – Increase
- DEC – Decrease
- SS – Slip Stitch
- St/Sts – Stitch / Stitches
Head – Pink yarn
- Make a magic ring (MR)
- 6sc into MR (6sts) – do not join to first stitch, carry on working in the round
- Inc in each st x 6 (12sts)
- 1sc, INC x 6 (18sts)
- 2sc, INC x 6 (24sts)
- 1Sc in each st (24sts)
- 1Sc in each st (24sts)
- 1Sc in each st (24sts)
- 1Sc in each st (24sts)
- 2sc, DEC x 6 (18sts)
- 1sc, DEC x 6 (12sts)
- Start Stuffing with soft toy filling
- DEC x 6 (6sts)
- SS, Fasten off (leaving a long piece of yarn for sewing together)
Beak –Black yarn
- Make a magic ring (MR)
- 4SC into MR (4sts) do not join to first stitch, carry on working in the round
- 1SC, INC x 2 (6sts)
- 2SC, INC x 2 (8sts)
- 1SC in next 2 sts, 1HDC in next 4sts, 1SC in next 2sts (8sts)
- INC in next st, 1SC in next st, 1HDC in next 4sts, 1SC in next st, INC in next st (10sts)
- 1SC in each st (10sts)
* Change colour to white yarn *
- 1SC in next 2sts, 1HDC in next 6sts, 1SC in next 2sts (10sts)
- 1SC in next 2sts, 1HDC in next 6sts, 1SC in next 2sts (10sts)
- 1SC in each st (10sts)
- Slip stitch. Fasten off (leaving a long piece of yarn for sewing together) and stuff the beak lightly with soft toy filling then sew to the head

Body – Pink yarn
- Make a magic ring (MR)
- 6SC into MR (6sts) do not join to first stitch, carry on working in the round
- INC in each st x 6 (12sts)
- 1SC, INC x 6 (18sts)
- 1SC in each st (18sts)
- 1SC in each st (18sts)
- 1SC in each st (18sts)
- 7SC, DEC x 2 (16sts)
- 6SC, DEC x 2 (14sts)
- 5SC, DEC x 2 (12sts)
Start Stuffing with soft toy filling
- 4SC, DEC x 2 (10sts)
- 3SC, DEC x 2 (8sts)
- 2SC, DEC x 2 (6sts)
- 1SC, DEC x 2 (4sts)
- SS, Fasten off (leaving a piece of yarn for sewing)
Neck – Pink yarn
- CH 8 (8sts), join to first CH, carry on working in the round
- SC into each st x 60sts
- SS, Fasten off (leaving a long piece of yarn for sewing together)
- Stuff firmly when sewing to head and body

Tail feathers – 1 Central & 2 Side Feathers
Central feather – Pink yarn (Make 1)
- CH 10. In 3rd CH from hook work 1DC in next 3sts, 1HDC in next 2sts, 1SC in next 2sts, 1SS in last st. Turn and work in other side of CH
- 1SC in next 2sts, 1HDC in next 2sts, 1DC in next 3 sts
- SS, Fasten off (thread the left over yarn through middle of the feather and knot at bottom to the beginning yarn)
Side feathers – Pink Yarn (Make 2)
- CH 8. In 2nd CH from hook work 1SS, 1SC in next 2sts, 1HDC in next 2sts, 1DC in next 2sts
- SS, Fasten off (leaving a long piece of yarn for sewing together)

Wings – Pink yarn (make 2)
- Make a magic ring (MR)
- 6SC into MR (6sts) do not join to first stitch, carry on working in the round
- 1SC, INC x 3 (9sts)
- 1SC in each st x 9 (9sts)
- DEC, 1SC in next 7sts (8sts)
- DEC, 1SC in next 6sts (7sts)
- DEC, 1SC in next 5sts (6sts)
- DEC, 1SC in next 4sts (5sts)
- SS, Fasten off (leaving a long piece of yarn for sewing together)
Flatten wing and continue with wing feathers
Wing feathers – Black yarn (complete on both wings*)
- Attach yarn with a SS to corner of the wing
- SC in each st (8sts), TURN * DO NOT WORK IN THE ROUND *
- In 1st st, CH 2, SS into 2nd CH from hook, SS into next st
- CH3, SS into 2nd CH from hook, SS into next st
- CH4, SS into 2nd CH from hook, SS into next st
- CH4, SS into 2nd CH from hook, SS into next st
- CH5, SS into 2nd CH from hook, SS into next st
- CH5, SS into 2nd CH from hook, SS into next st
- CH6, SS into 2nd CH from hook, SS into next st
- Fasten off & weave in ends
* For other wing, work backwards ie ch6 row first, working back to ch2 row*
Legs – White yarn (make 2)
- CH 11
- SS into 4th st from hook, * CH 3, SS back into same st * repeat * – * two more times then SS in each CH back towards beginning
- Fasten off & weave in end
Next:
- Sew all pieces together.
- Sew eyes in black yarn onto the flamingo’s face.
- Sew keyring attachment securely to the top of the flamingo’s head.
I hope you have enjoyed making your very own Flossy the Flamingo keyring. If you need any further guidance please contact me.
Let me know if there are any issues with the pattern, or anything you don’t understand.
Also, if you make one (or more!) please leave a picture in the comments and link back to this page.
See you soon
Notice: This pattern is for personal use, please feel free to sell your finished items made from this pattern but please give credit to Beejui Creations as the pattern designer and link back to the original pattern . Please be kind and do not sell or distribute this pattern in any way. Thank you!
amigurumi Blog Free Patterns patterns Accessories amigurumi Crochet cute Flamingo Gallery handmade keyring patterns Pink White

