Character Keyring Crochet Pattern – Free
Character Keyring Crochet Pattern – Free Crochet / Amigurumi Pattern
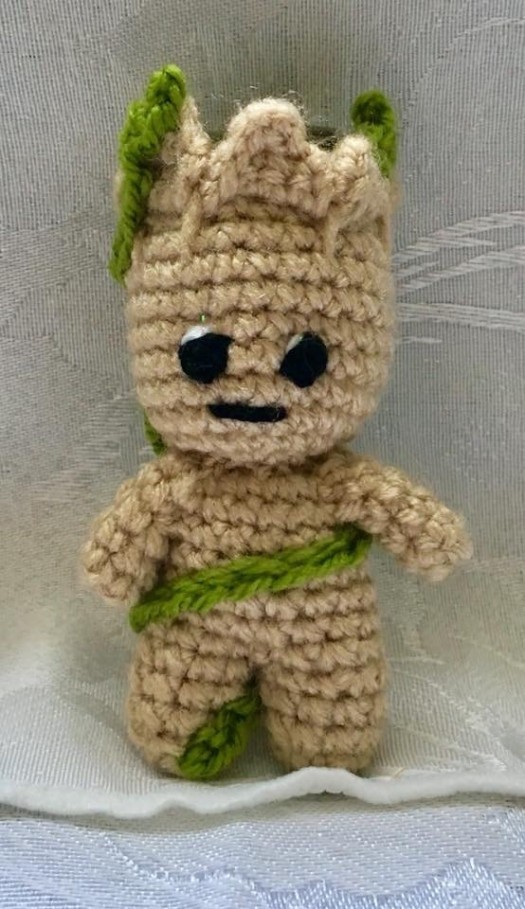
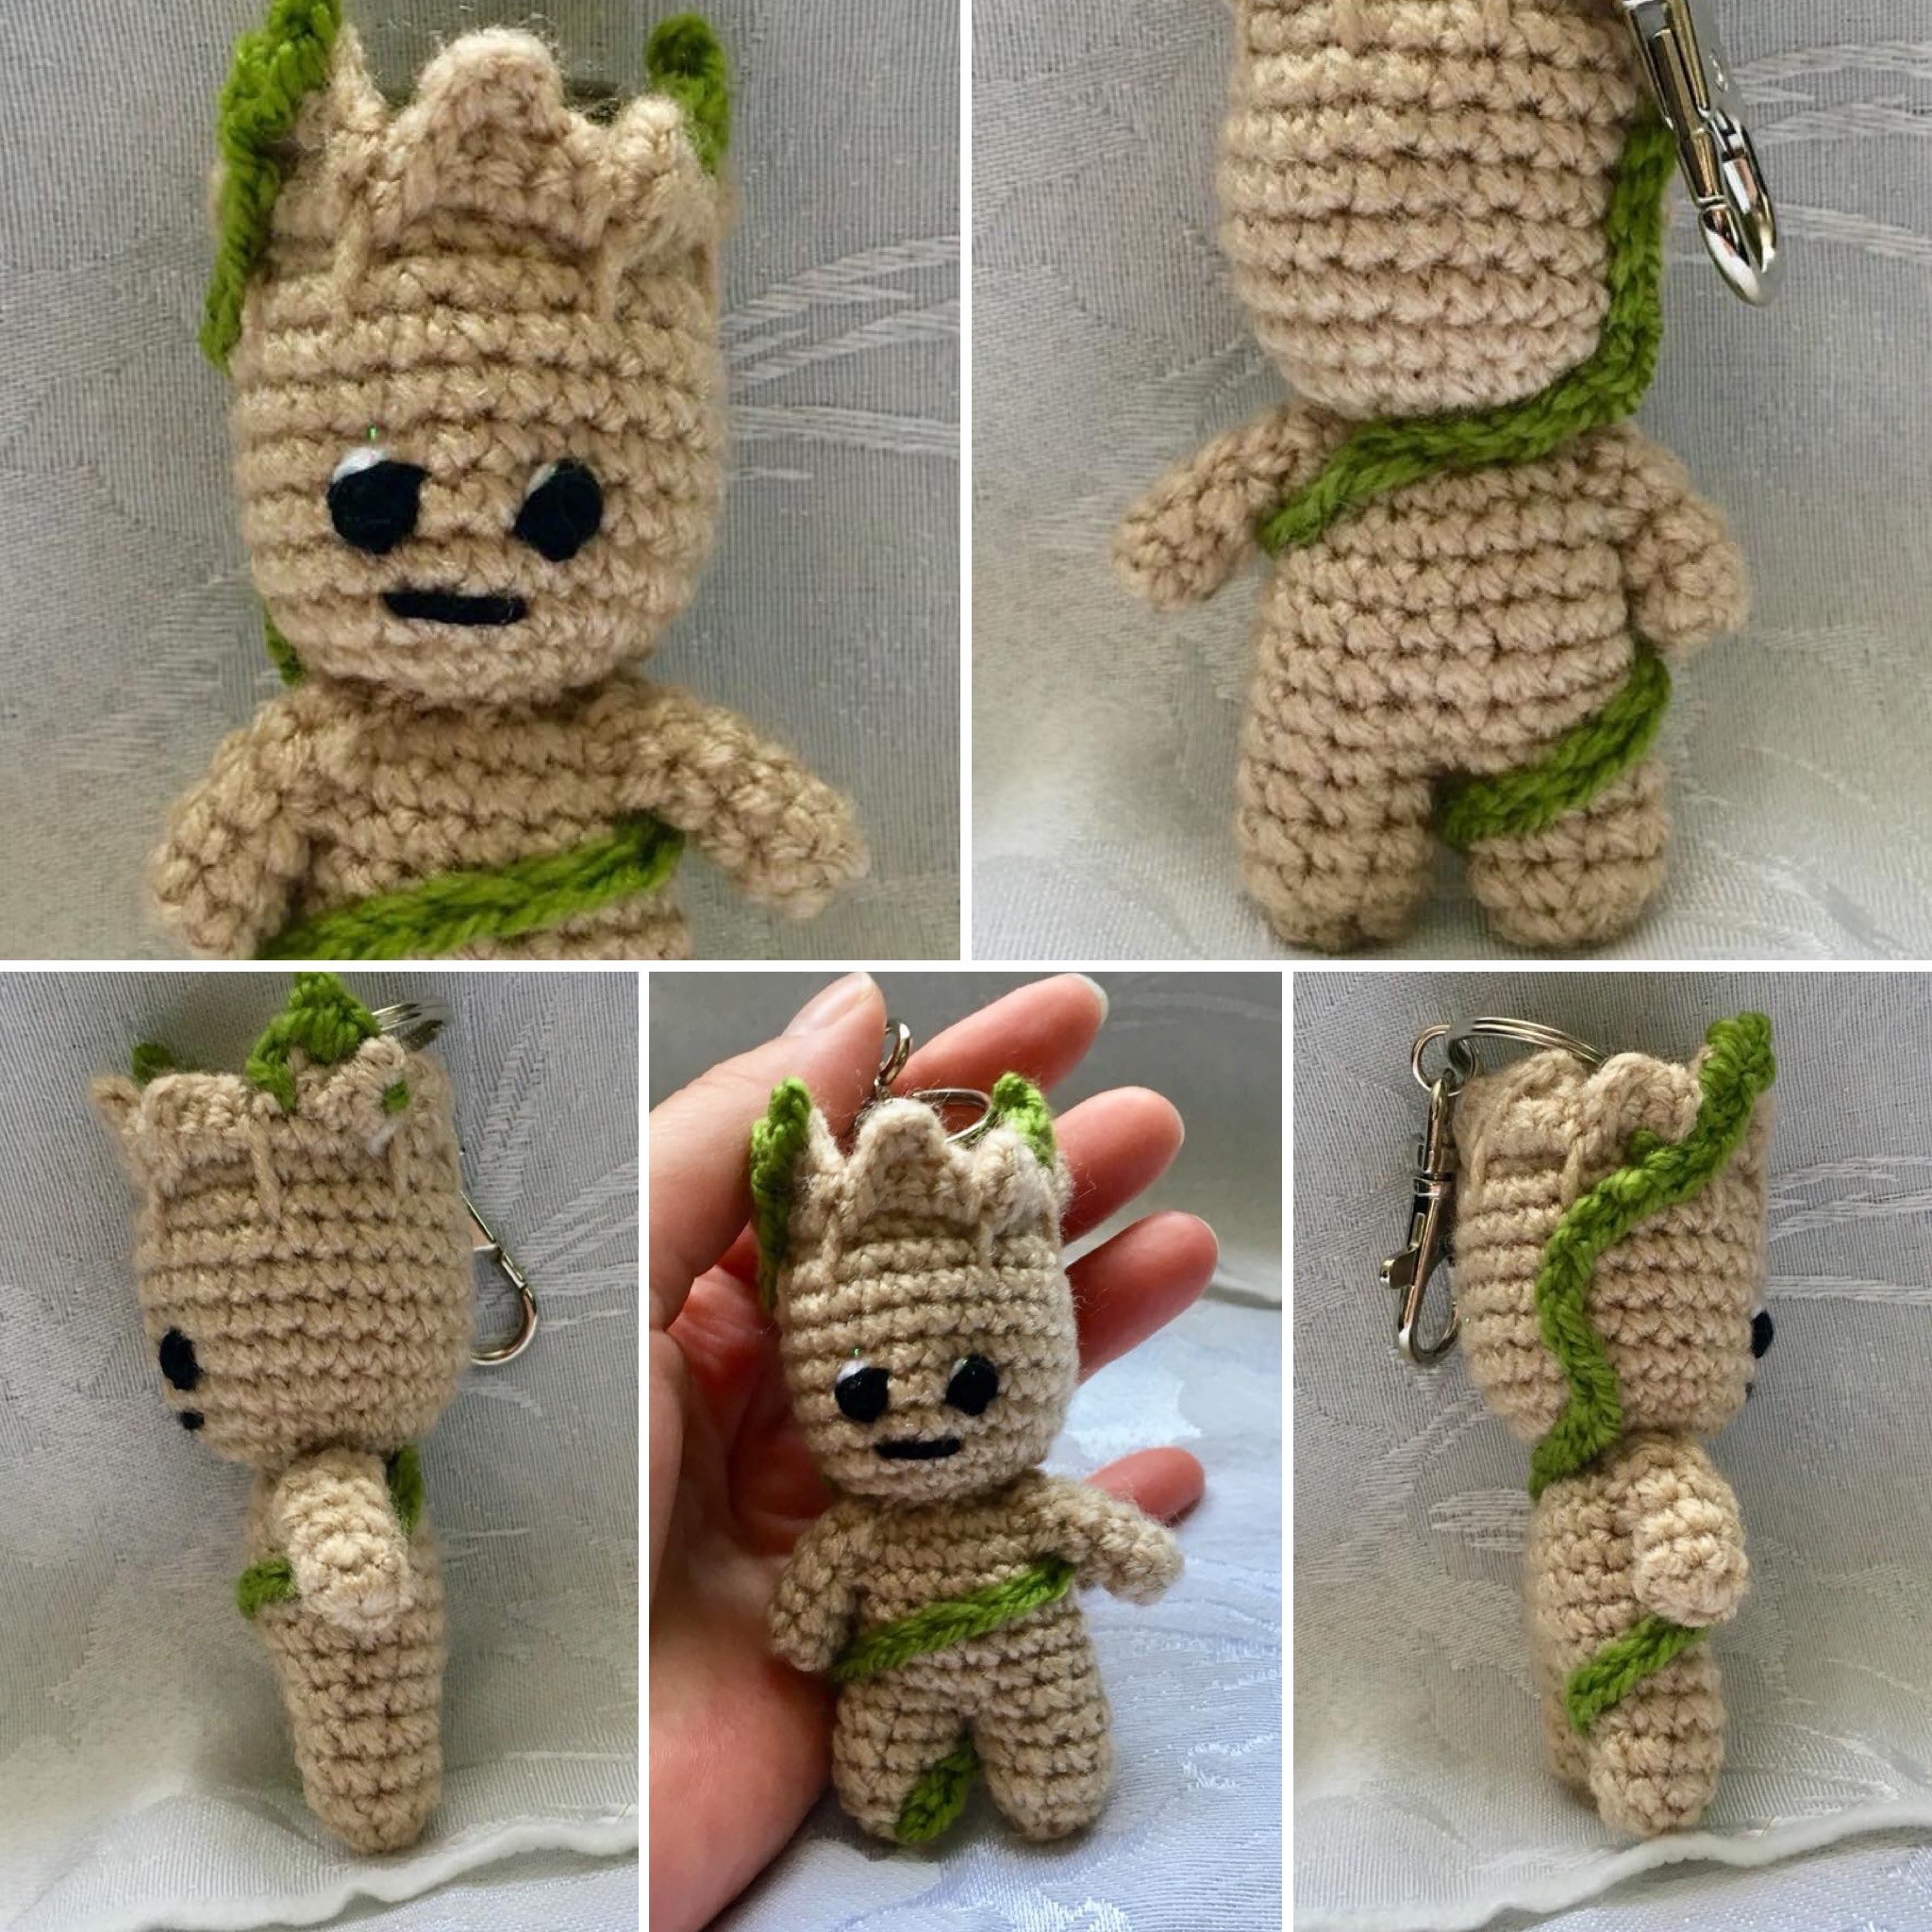
Character Keyring Crochet Pattern – Free Crochet / Amigurumi Pattern. This pattern was designed because I just love him. He’s so adorable! I have a bobblehead of him in my car and he makes me smile daily.
You could make this into a keyring like I have, add a ribbon to the top of the head or leave it as a small soft plushie, you choose!

For the Character Keyring Crochet Pattern you will need:
- 3.5mm / 4mm crochet hook (depending on how tight you crochet, I used a 3.5mm)
- DK yarn in
- Camel Stylecraft Special DK yarn
- Cypress Stylecraft Special DK yarn
- White Stylecraft Special DK yarn
- Black Stylecraft Special DK yarn
- (I’m unsure of the amount I used but it was less than 50g of each)
- Soft toy filling
- Darning needle to sew it all together
- Keyring attachment (if using)
This post contains affiliate links. If you use these links to buy something I may earn a commission. Thanks.
Stitches / Abbreviations: (US Crochet)
- MR – Magic Ring
- SC – Single Crochet
- INC – Increase
- DEC – Decrease
- SK – Skip Stitch
- SS – Slip Stitch
- St/Sts – Stitch / Stitches
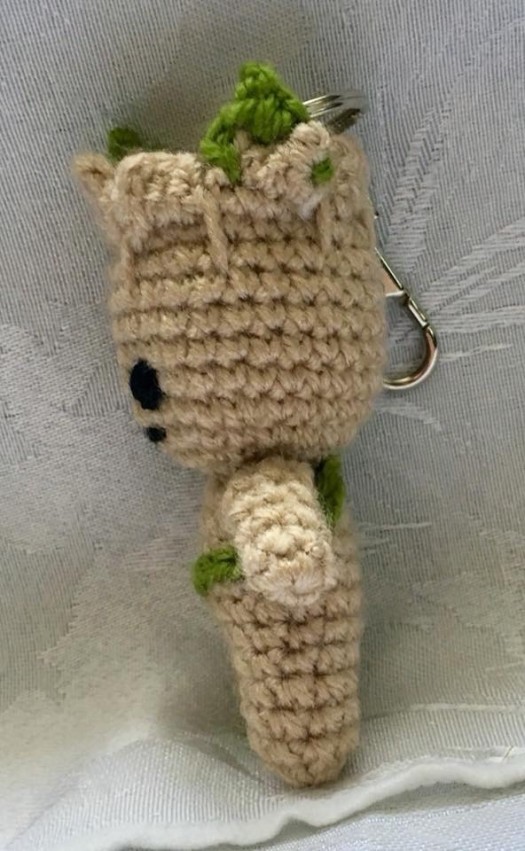
Character Keyring Crochet Pattern – Head (made in 2 parts) – Beige Yarn
The completed project is made up of two patterns. The body is my pattern but the pattern for the head is not my design, it came from this fab designer: blog.twinkiechan.com/2014/08/13/baby-groot/#more-5970
I have tweaked the original pattern slightly (see below) but credit still goes to the above – Thank You!
Head Part A
Make a magic ring (MR), 6SC into MR (6sts) do not join to first stitch, carry on working in the round
INC in each st x 6 (12sts)
1SC, INC x 6 (18sts)
2SC, INC x 6 (24sts)
7SC, INC x 3 (27sts)
1SC in each st (27sts) x 5 rows
SS – Do Not Fasten Off
Broken-wood head accents
You’ll be crocheting triangular-ish and rectangular-ish shapes, and then slip stitching down one side of each shape to get your hook back to the head. We do this so we don’t have to break off and rejoin over and over again to continue our work. I broke each shape into different paragraphs so that they are easier to see and organize.
Character Keyring Crochet Pattern – Continue Pattern
Ch 1, 3 sc evenly. Ch 1, turn. 3 sc evenly. Ch 1, turn. Sk 1 st, 2 sc evenly. Sl st down the side of the rows you just worked until you are about to work into the head again.
4 sc evenly. Ch 1, turn. 4 sc evenly. Ch 1, turn. Sk 1 st, 1 sc, sk 1 st, 1 sc. Ch 1, turn. Sk 1 st, 1 sc. Ch 1, turn. Sl st down the side of the rows you just worked until you are about to work into the head again.
4 sc evenly. Ch 1, turn. 4 sc evenly. Ch 1, turn. 3 sc, sk last st. Ch 1, turn. 3 sc. Ch 1, turn. Sk 1, 1 sc. Sl st down the side of the rows you just worked until you are about to work into the head again.
3 sc evenly. Ch 1, turn. 3 sc evenly. Ch1, turn. 1 sc, sk 1, sl st. Sl st down the side of the rows you just worked until you are about to work into the head again.
4 sc evenly. Ch 1, turn. 4 sc evenly. Ch 1, turn. Sk 1 st, 1sc, sk 1 st, 1 sc. Ch 1, turn. Sk 1 st, 1 sc. Ch 1, turn. Sl st down the side of the rows you just worked until you are about to work into the head again.
You should be able to see the ‘broken wood accents’ forming
3 sc evenly. Ch 1, turn. 3 sc evenly. Ch1, turn. sk 1, 2 sc. Sl st down the side of the rows you just worked until you are about to work into the head again.
3 sc evenly. Ch 1, turn. 1 sc , sk 1, 1 sc. Ch1, turn. Sk 1, 1 sc. Sl st down the side of the rows you just worked until you are about to work into the head again.
3 sc evenly. Ch 1, turn. 3 sc evenly. Ch1, turn. 1 sc, sk 1, sl st. Sl st down the side of the rows you just worked until you are about to work into the head again.
SS into the head and fasten off. Weave in ends.
Now you’ll finish the top of the head. You’re just making a circle to cover the hole ( Head Part B)
Head Part B – Beige Yarn
Make a magic ring (MR), 6SC into MR (6sts) do not join to first stitch, carry on working in the round
INC in each st x 6 (12sts)
1SC, INC x 6 (18sts)
2SC, INC x 6 (24sts)
SS and fasten off. Leaving 24 inches of yarn. (For sewing to Part A of head)
Lightly stuff Head Part A.
Since Head Part B is 24 sts around and open hole of Head Part A is technically 27 sts around, you can’t sew stitch for stitch, so just sew it on as best you can and make it look good. I found that using a 27 st circle was too big for the opening.
You can use the top of Head Part A as a guide for sewing. While sewing, you also don’t want the head to look like it has Frankenstein stitches going all around it, so try to sew as invisible as you can. Put in more stuffing if needed.
The following continues as my pattern
Character Keyring Crochet Pattern – Body – Beige Yarn
Make a magic ring (MR), 6SC into MR (6sts) do not join to first stitch, carry on working in the round
INC in each st x 6 (12sts)
1SC, INC x 6 (18sts)
1SC in each st (18sts) x 5 rows
Separate the legs making a slip stitch in the other side of the body. Work legs separately. Working in 9sts each side.
1SC in each st (9sts) x 4 rows
Start Stuffing with soft toy filling
1SC, DEC x 3 (6sts)
SS, Fasten off and sew end of foot closed
Attach yarn to body for next leg and repeat
1SC in each st (9sts) x 4 rows
Start Stuffing with soft toy filling
1SC, DEC x 3 (6sts)
SS, Fasten off and sew end of foot closed
Arms (make 2) – Beige Yarn
Make a magic ring (MR), 6SC into MR (6sts) do not join to first stitch, carry on working in the round
1SC in each st (6sts) x 5 rows
SS, Fasten off and sew to body
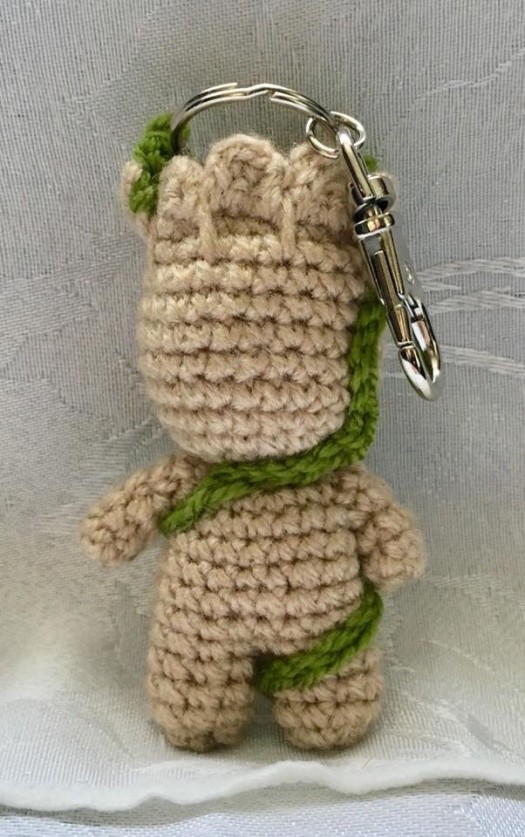
Sew the head and arms to the body
Leaf Garland – Light Green Yarn
Ch 45, fasten off (leave long tails for sewing onto body)
Wrap around your character, sewing as you go
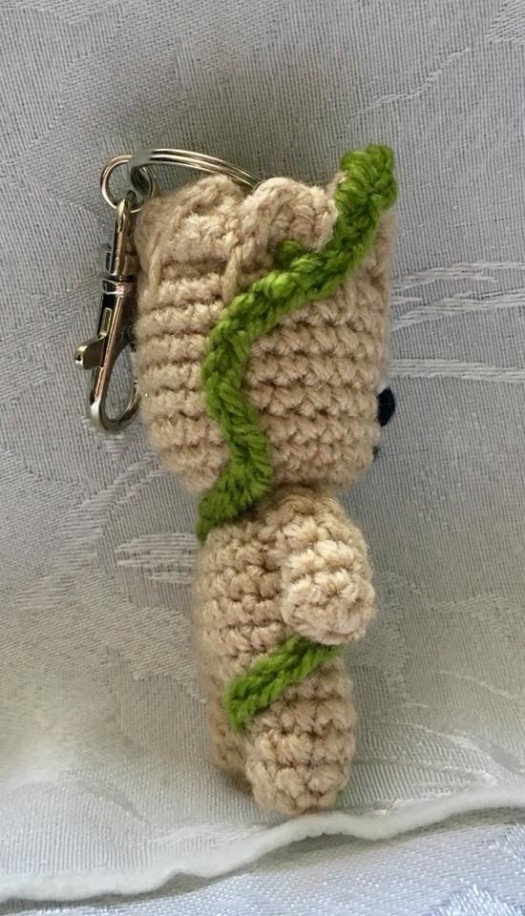
Sew the eyes and mouth on with black and white yarn
Sew the keyring attachment securely to the top of the character’s head.
I hope you have enjoyed making your very own Character Keyring Crochet Pattern – Free. If you need any further guidance please contact me at Beejui Creations
Follow my blog by joining my email list
Do not copy, sell or translate any of the images on this page without authorisation. You can share to Social Media but please link back to this page. Thank you.
Copyright © Beejui Creations 2018 – 2022. All Rights Reserved.
Check out my other crochet keyrings:

Accessories amigurumi Blog Free Patterns Handmade crochet patterns amigurumi Character Crochet DKyarn Free Patterns green handmade keyring patterns tree


Do you have a pattern for the groot key chain?
LikeLike
My apologies! It was there …
Just revamped post, for some unknown reason the pattern links had vanished
If you have any further queries please contact me
Thanks
Beejui Creations
LikeLike